TL;DR
- Chrome DevTools Override can help illustrate changes to leadership and developers.
- This tool is pretty limitless and can help anyone learn how to manipulate web pages.
- The override feature allows you to save your changes so it doesn’t disappear when you reload.
SEOs have become very technical to the point where they can make technical changes themselves without a developer or programmer. It is an awesome trend that I continue to try and get better at so I can grow my skills. Sometimes the problem is that digital marketers and SEOs do not have permission to edit certain areas of the site. Many of us have CMS access, but we are often locked out of any CSS or JS files that are only touched by the development team.
Since I run into this issue a lot I was looking for a way to highlight certain changes to help speed up buy-in so we could get some technical optimizations pushed through. This led me to the local overrides feature in Chrome DevTools. Chrome DevTools is an awesome tool that has a lot of features that can help any technical SEO. The issue is that when you refresh, any changes you made disappear. Not anymore with Chrome DevTools override!
Google Chrome Local Overrides Video Walkthrough

Override Tab In Chrome & Enable Local Overrides
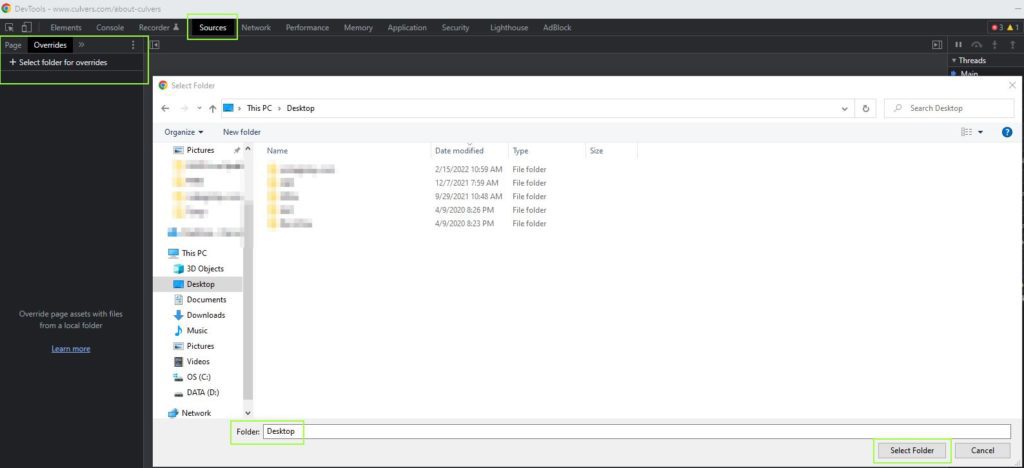
- Inspect the page you want to edit.
- Go to Sources in the menu at the top.
- Check the box ‘Enable Local Overrides’.
- Choose where you want to save the folder (I like desktop).
- Click Select Folder.
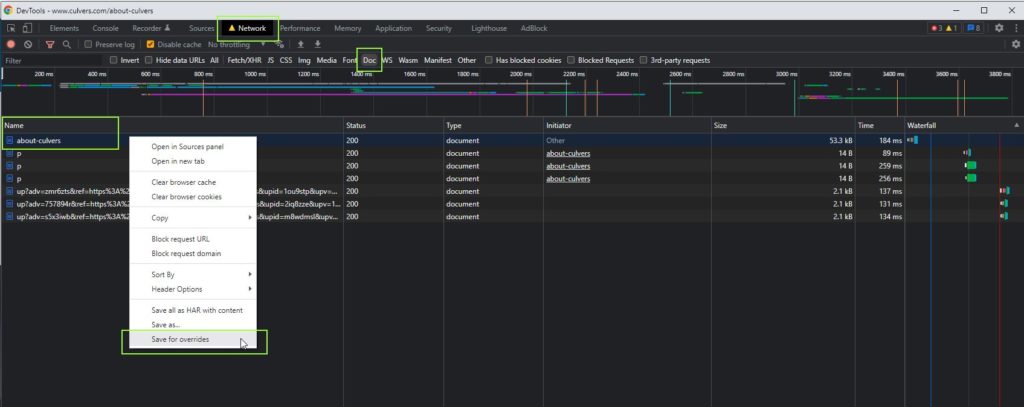
- Now you can go into the Network tab and select the file you want to edit.
- I like to sort by Doc, CSS or JS depending on what I need to do (below).
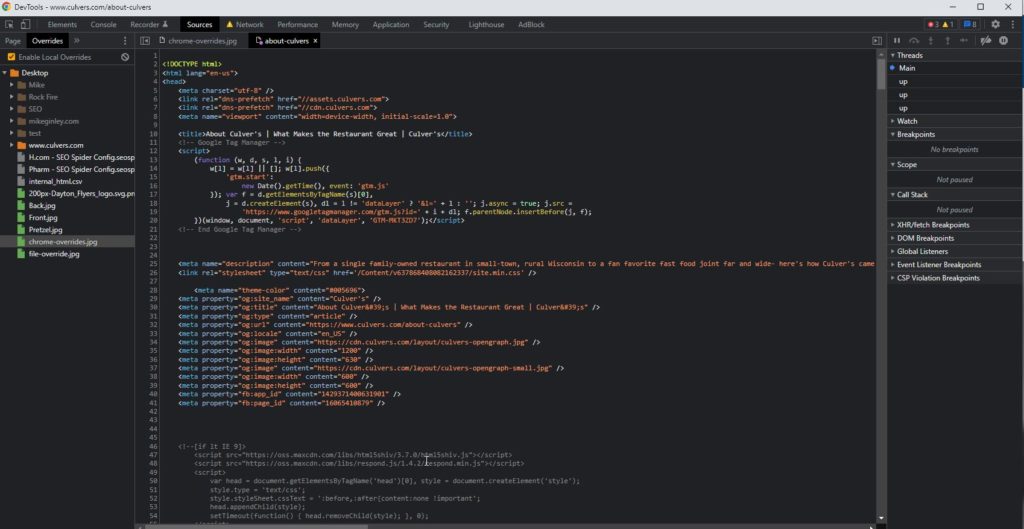
- You can go back into the Sources tab and see the files you saved and now you can edit them.
- Whenever you make an edit, ctrl + s to save changes so they continue after reload.
How This Benefits SEO & Digital Marketing
Now that we know how to enable Chrome local overrides we can start changing the page and not worry about it disappearing when we refresh. We can also save the work for another time by storing the folder and bringing it back in following the process above.
The ways I have used this so far are to create a CTA through CSS and enable lazy loading to show the page speed impact by deferring offscreen images. This process can be pretty limitless.
This can be helpful with:
- Core Web Vitals
- Debugging CSS & JS
- Graphic Changes
- And Many More!
I will go over the lazy loading on Culver’s as well as add a CTA to show you how to manipulate and save the page.
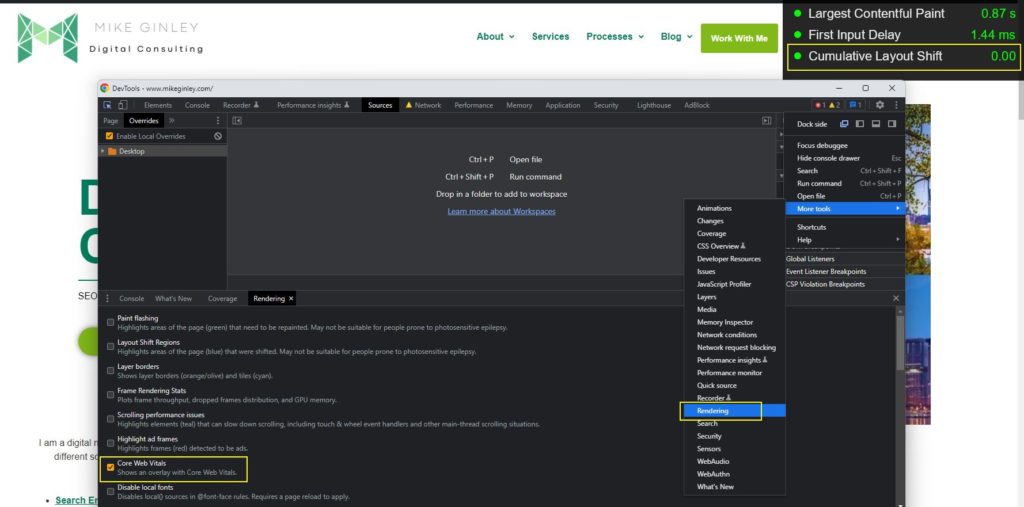
Chrome Overrides For Core Web Vitals – Cumulative Layout Shift (CLS)
- Visit https://www.mikeginley.com/
- Enable local overrides like the above and save the folder to your desktop.
- Inspect in Chrome – Enable ‘Rendering‘ under ‘More Tools‘ (see image below).
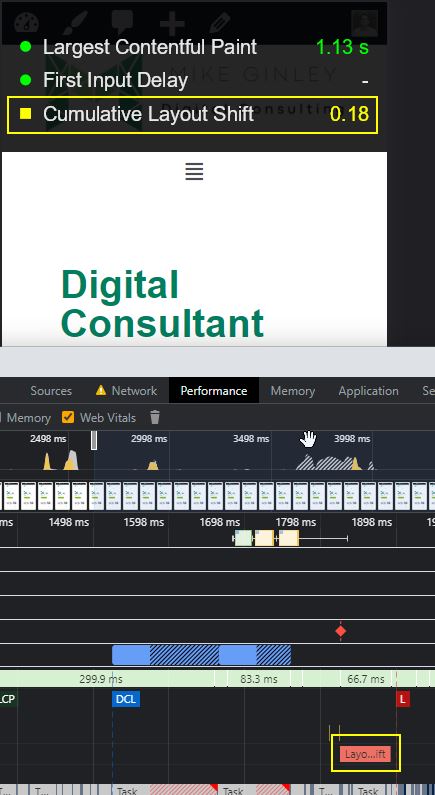
- Scroll down and enable ‘Core Web Vitals‘, you will see metrics pop up in the top right of the screen (see image below).
- Currently, my CLS is 0! But we can break that to see how overrides can show us the impact of our changes.
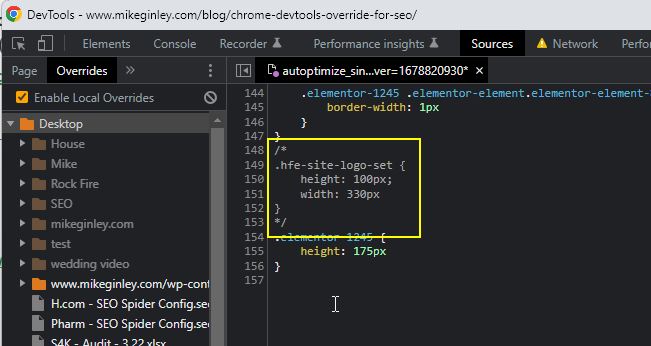
- I had a CLS issue caused by my logo. Find the class ‘hfe-site-logo-set‘.
- Click on the associated stylesheet controlling the logo sizing.
- Comment out the height & width with /* */ (see image below).
- Save ‘ctrl + s‘.
- Hard refresh ‘ctrl + shift + r‘.
- The desktop was never bad, but mobile you can see is pretty badly impacted .18! (see image below)
- Go back into the stylesheet and remove the comments and reload to see it’s back to 0!
Chrome Override For Page Speed – Lazy Loading
- Visit https://www.culvers.com/about-culvers.
- Enable local overrides like the above and save the folder to your desktop.
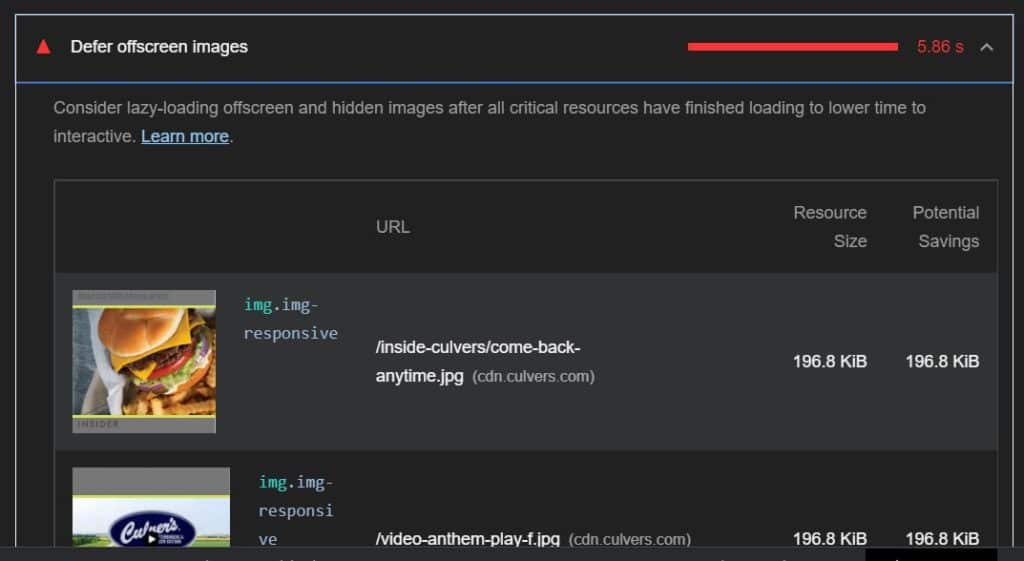
- Run a Lighthouse test in Chrome DevTools under the Lighthouse menu option.
- You will see the ‘Defer offscreen images that could save ~5 seconds.
- Go into the Network tab and save the doc file for overrides as we did above.
- Make sure when editing in the Sources tab to hit the pretty print icon brackets in the bottom left.
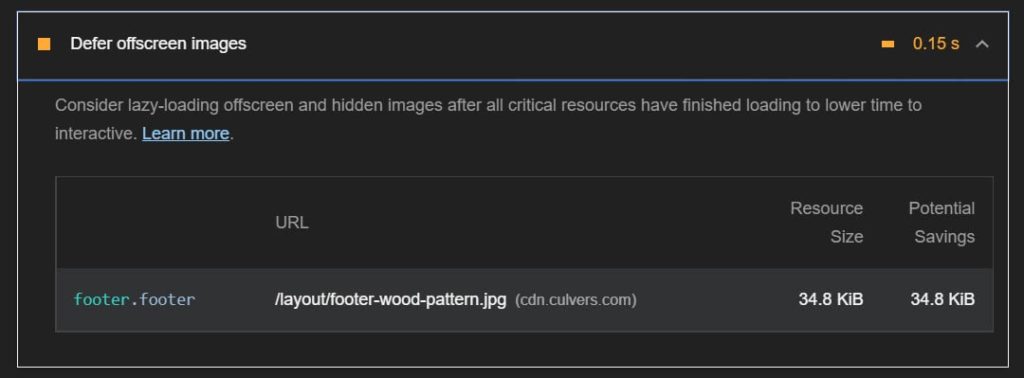
- Now we can search for every image and add loading=”lazy” (like below).
- After we do that hit ctrl + s to save the file locally.
- Now run Lighthouse again and you will see all the images that were flagged are now gone (like below, I left one to show that it works).

Add a Call To Action
- Visit https://www.culvers.com/about-culvers (or any webpage).
- Enable local overrides like the above and save the folder to your desktop.
- Go into the Network tab and save the doc file for overrides as we did above.
- Go into the Network tab and save the CSS file for overrides as we did with the doc.
- In the Doc file add the HTML code below.
- In the CSS file add the CSS code below.
- After we do that hit ctrl + s to save the file locally.
- Reload, if you did this send me proof on Twitter!
HTML
<div class="container">
   <div class="callout">
      <h1 class="h1-callout">Who Is The Most Average SEO?</h1>
      <a class="btn-callout">It Me</a>
   </div>
</div>

CSS
.callout {
    position: relative;
    padding: 70px 20px;
    margin: 25px 15px;
    text-align: center;
    background-image: URL("https://www.mikeginley.com/wp-content/uploads/2022/02/mike-ginley.jpg");
}
.h1-callout {
    font: 'sans-serif';
    color: #ffffff;
     /*setting alpha = 0.1*/
    background: rgba(0, 0, 0, 0.3);
    font-size: 48px;
    margin-bottom: 10px;
}
.btn-callout {
    line-height: 40px;
    margin: 20px auto 0;
    color: #fff;
    background: #00825f;
    font-size: 22px;
    max-width: 600px;
    margin: 35px auto 0;
    padding: 10px 25px;
    font: sans-serif;
    text-decoration: none;
}
Additional Chrome DevTools Resources
This was just a very small sample of what can be done with the local overrides and Chrome DevTools. I am going to keep documenting new processes as I come up with them and I hope others do as well. The code for both can be way better, this is just a bandaid to better illustrate what is needed for the devs who are way better at this than me.
If you are new to using Chrome DevTools or looking for some additional tips, these are my favorites.
- Chrome DevTools for SEO – Anything JC does should be followed. Python for sure!
- Overview of Chrome Developer Tools’ Most Useful SEO Options – Same as above, follow everything they do, they’re super smart.
- Webinar – Getting More Out of Chrome DevTools for SEO – SEMrush is just the best!
About Me
I am mainly using this site as a portfolio to create content that can help others in the industry. I have learned so much from people in this field and I want to do my part to help as well. I will continue to create processes and free templates that can hopefully help anyone in SEO and Digital Marketing. If there is anything you are looking for or have questions about please reach out to me on my Contact page or on Twitter!
Who To Follow
Interesting/smart accounts you should be following on Twitter: